Featured
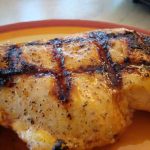
Grill Marks Made Easy
Ever wonder why steaks look so much better on TV?
For some reason that diamond shaped stamp of caramelization equals the true sign of a perfect steak.
Any BBQ cook should know the secret to professional presentation GRILL MARKS. Gotta have ’em. It’s mainly a matter of paying attention from the start.
- First, crank up the heat like you would on direct heat grilling. Heat Helps.
- Immediately clean the grill grates and oil with a wet (with oil) napkin.
- Place the meat on the grill in the same direction so you’ll mark them the same. Once you set it down — LEAVE IT ALONE – until:
- After one fourth the cooking time simply rotate the piece either 45 degrees (for diamond) or 90 (for squares).
- At the halfway point… flip and repeat from step three.
- One side typically looks better than the other. Put that side up.
Competition Judging
Turkey Fryer Tricks
Tips And Tricks For The Turkey Fryer
By Chet Hastings
There is always a learning curve with any new appliance or gadget. The turkey fryer is no different. There are some simple tips that can get you started quicker and with greater confidence. One of the first questions is usually, “How do I know how much oil to put in the pot?” This is an important question because if too much oil is in the pot and heated then it will most likely overflow the pot or boil over the edge when the turkey is placed in the pot.
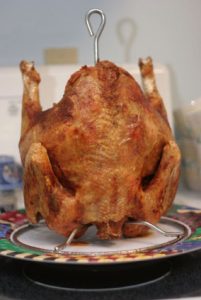
A good method to use to determine the exact amount of oil needed with the bird you are going to fry is to place the bird on the stand in the pot and then fill the pot with water to about 2 inches over the bird. Now remove the bird and note the water level. Make a measurement from the top of the pot to the top of the water level.
Now all that is needed is to dry the pot and the turkey. Fill the pot with oil to the same level that the water had reached without the turkey. When the oil is heated you can now safely insert the bird with confidence that the level is proper. Even though some pots have an etched or stamped mark indicating the top oil level it might always be a good idea to run your own test with the turkeys you are going to be using in order to save oil and also for added safety.
Oil can be used for times as long as 4 or 5 hours to cook additional turkeys as long as the temperature remains at the recommended 350 degrees. Be sure not to let the oil rise higher than 375 degrees or it will began to smoke and break down and become rancid. Oil is reuseable if it is properly drained, filtered and properly stored.
Keep in mind that the more the oil is used the greater the chance it can retain minute amounts of sediment which could affect the flavor of the finished bird. Experience would be the best teacher as you get more and more use from your turkey fryer. If your oil has been used a lot and you are not sure of its quality run a simple test by frying a few potato wedges in a sample of the oil. Tasting these will quickly tell you if the oil has gone rancid. You should use a funnel equipped with a filter to strain the oil when removing it from the pot and placing in back in the storage container.
Of course it goes without saying that the oil needs to be completely cooled before draining. Handling hot cooking oil is a sure path to injury or at the least a terrible mess. In a very short period of time I am sure you will become rather fond of your turkey fryer as you receive more and more compliments about your new cooking skills and you are not a slave to an oven for 4 or more hours to roast a turkey.
Find some great tips and bargains here: Stainless Steel Turkey Fryer and here:
Choosing A Turkey Fryer
Article Source: http://EzineArticles.com/?expert=Chet_Hastings
http://EzineArticles.com/?Tips-And-Tricks-For-The-Turkey-Fryer&id=5384722
Flank Steak Tailgate BBQ
A Great Tailgating Recipe – Flank Steak
Just about everyone in the United States like to grill out. However, many people are only comfortable barbecuing the basics such as chicken legs and hamburgers. Here’s an approach to grilling you can “steak” your reputation on:
Whether you decide to use a charcoal or gas grill, having the right accessories on hand makes for easy and safe grilling-and even easier cleanup. A wide spatula, extra-long tongs, a long-handled brush and a spray bottle with water are the benchmark of a great griller’s tool kit.
Direct-heat grilling is best for thin cuts of meat that cook quickly. It gets them nicely browned on the outside in the short time they take to get done in the middle. Below is a great recipe for using the direct-heat grilling technique…
How to Make: Flank Steak with Green Olive-Jalapeno Tapenade
About this Dish: A Mediterranean-inspired tapenade is a flavorful addition to this tender flank steak. This is the perfect dish for a great Tailgate party.
Prep time: Approximately 20 minutes
Grill time: 13 to 17 minutes, plus 5 minutes to rest off the grill
Makes: 4 servings
The Ingredients:
1 jar (4.5 oz.) Stuffed Jalapeño Olives, drained
2 garlic cloves, peeled
1 cup coarsely chopped Italian parsley
2 tablespoons fresh rosemary leaves
1 tablespoon grated lemon peel
1/4 cup Olive Oil
1 Flank Steak (about 11/2 lb.)
How to Cook it:
1. Prepare barbecue grill and preheat for direct-heat cooking. For charcoal grill, before you put the grill over the hot coals, brush it with a medium coat of oil; for gas grill, when hot, brush grill with a medium coat of oil.
2. Rinse olives and drain well. Combine olives, garlic, parsley, rosemary, lemon peel and oil in a food processor and pulse until mixture forms a fine paste. Set aside 1/2 cup of the tapenade mixture for seasoning meat; reserve remainder for serving or another use.
3. Rinse flank steak and pat dry. With the tip of a sharp knife, make shallow diagonal cuts about 1 inch apart over one side of steak, then make cuts perpendicular to the first to create a diamond pattern. Repeat on other side of steak.
4. Spread 1/2 cup of the olive mixture on both sides of steak to coat evenly.
5. Lay steak on oiled grill over a solid bed of hot coals or high heat on a gas grill. Keep charcoal grill uncovered; close lid on gas grill. Cook steak until browned on the bottom (lift edge with tongs to check), 8 to 10 minutes. With tongs or a wide spatula, turn steak and continue to cook until done as desired, about 2 minutes longer for rare (red in center; cut to test) or 4 minutes longer for medium-rare (pink in center).
6. Transfer steak to a clean platter or rimmed carving board and let rest about 5 minutes, then cut in thin, slanting slices across the grain to serve. Offer remaining tapenade to add to the meat to taste.
Recommended Tools: Grater (for peel), strainer or colander, measuring cups and spoons, food processor, paper towels, sharp knife, spatula for spreading, heatproof brush for oiling grill, tongs or wide spatula, platter or rimmed carving board.
For more Great Tailgating recipes check out…
http://www.StadiumSeatingChart.info
Article Source: http://EzineArticles.com/?expert=Adam_Schlosser
http://EzineArticles.com/?A-Great-Tailgating-Recipe—Flank-Steak&id=5199131
Cuban BBQ Box Makes Roasting Easy
Caja China Cooking History and Delicious Recipe Ideas
Seemingly, there is as much mystery surrounding the origins of the “caja china” as there is about how to use one for those not familiar with the roaster. Stories have been told about the roughly 150,000 Chinese laborers who came to Cuba in the 1850’s, and that they brought the cooking style to the island, hence the term “caja china.” Research, however, indicates no known record of the roasting box dating this far back. In fact, there appears to have been relatively little co-mingling between the Chinese and Cuban cuisines. So where then did the box originate, and where did the name “la caja china” (the Chinese box) come from?
According to food anthropologist Sidney Mintz, a more likely scenario is that the term “china” or “chino” does not represent the country in this case, but is actually a common Hispanic term that describes something as exotic, mysterious, or clever. Using this interpretation, “la caja china” would translate as “the clever box” rather than “the Chinese box.” This hypothesis is strengthened by renowned Cuban chef Maricel Presilla of the restaurant Zafra in New Jersey when she states, “Cubans like to call anything that is unusual or clever Chinese. And this is true all over the Caribbean. Pretty much any culture there, whether Cuban or Puerto Rican or Dominican, they have somewhere some kind of thing like this-a Caja China.” (Sifton) Variations on the box can be found in various countries, and go by a variety of names. In Peru there is the “caja china criollo,” in the Cuban community the “caja asadora” (roasting box) and “asador cubana” (Cuban roaster).
In Louisiana’s Cajun community it is referred to as a “Cajun microwave.” The reality is that all these roaster boxes are very similar in their style of cooking, using heat from charcoal and the pressure of an enclosed roasting box to cook large amounts of food in an incredibly short amount of time. Not only is the cooking time shortened from eight or more hours for a large pig to just four, but the meat comes out incredibly tender. It is, in my opinion, the best kept secret in the American barbecue community today. You can purchase one, along with its accessories, at http://www.shoplatintouch.com. Once you own one, you’ll wonder what took so long.
Mat Masters is the President and CEO of Latin Touch, Inc. a Miami, Fl based business that is one of the leading online retailers of consumer products with a Hispanic flavor. His best selling products are La Caja China, Domino Tables, and Kitchen Accessories, etc.
Article Source: http://EzineArticles.com/?expert=Mathew_Masters
http://EzineArticles.com/?Caja-China-Cooking-History-and-Delicious-Recipe-Ideas&id=5322617
BBQ Grill Cleaning Tips
Thoroughly Clean Your Barbecue Top to Bottom
The Grill
Existence will be much easier if the dirt is loosened before scrubbing. A fast way to do this would be to wash at the end of a cookout when the bbq is still hot, and the muck hasn’t had time to cake on yet. If you are still entertaining and don’t fancy this, or simply overlook, there are still options available. For lidded bbqs, a neat way of softening up grime is actually to place a water-soaked newspaper or equivalent inside and use a gentle heat again for 30 minutes approximately. This will essentially steam clean the whole inside, and you’ll chuckle as you lightly wipe away the grime afterwards. Obviously this is simple for gas versions, however for those who have charcoal try using a few small bits of fire wood or even other easily flammable material to obtain some warmth going, or just a few coals if you must. Keep close track of the newspaper though and ensure it does not burn or you will have more mess on your hands! Regardless of whether you steam or not, chemical cleansers will also be a great choice. Take away the grill and place on some newspaper, and spray liberally with stove solution or other spray on cleansers (like you would use in your kitchen) and leave for an hr or so.
Now it’s time to get scrubbing up. Do not use balled up pieces of foil on your nice brand new barbeque grill, instead make use of special scrubbing stones or even scrapers which you can purchase to break off difficult, brittle grime. Much softer mess can be taken off with a regular soft cloth or skillet scourers. Be cautious with enamel-coated grills, you need to loosen grime very well first and then make use of a mild pressure as possible. Lastly, give the bbq grill a good wash and leave in order to dry.
Inside
For those who have were able to steam-soften the inside of the bbq itself then things should be easier. For straightforward grilling with charcoal bbqs, scoop or tip out any coal mess, as well as clean up the final bits with some damp kitchen roll. Now wipe the areas down with a soft cloth covered in spray solution, lightly scrubbing any kind of stubborn areas. If there are places which have burned on food you cannot get rid of, you may have to spray on some stove cleaner and leave for some time but read the cleaner directions to ensure it is suitable for the surface in question (i.e. enamel, painted, steel etc). Don’t worry about the base where the hot coals sit as this is unlikely to be looking great as scuffs and burns build up here. So long as it’s clean and free from aged waste materials you will not get any nasty smells in the next cookout. Gas bbqs can be a little more tricky. Many places can be cleaned just as with the methods above, but gas outlets and lava rocks etc add extra work. Start by removing any lava rocks or ceramic coals and put all of them into a bucket of warm soapy water. If you can now thoroughly clean round the burners and flavouriser bars with ease – great. Nevertheless, you might have to remove certain parts to clean them properly, so consult your manual, and remember to not start removing any gas-ferrying parts that you’re unclear about. Put them back when you are done, and wash the actual lava rocks/coals in the bucket if needs be and wash them in freshwater. You may find these need changing after a year or so if they are accumulating grime. Finally, rinse the interior of the charcoal or gas barbecue with a hose pipe or perhaps a bucket of water until it appears nice and sparkly, and replace the lava rocks etc. Replace the grill and stand back to admire your work.
Outside
The outside of the bbq is easy. Simply clean it down with a damp cloth, adding a suitable solution – normal cleaning up liquid ought to be good, but you can get stainless steel polishing spray or other material-specific cleaners. Gas control buttons can often be removed to clean, which is essential as you do not want dirt to accumulate and trigger stiffness. Be careful with any kind of flaky paint or chipping enamel – you can always retouch these places but make sure you seek advice from either a manual or even the manufacturer first on what precisely to use. Once clean, buff the outside with a dry cloth and add any preservative films you want. Many people recommend cleaning down stainless steel models with oil (even baby oil) to keep the elements at bay, but don’t worry too much. It is smart to take time to protect any wooden areas though with a dedicated barbecue wood oil treatment. Please, please beware of chemical preservatives or treatments you utilize somewhere else in the home. Some may be flammable and have no place on a bbq!
Now it is all clean and polished, it will be ready for the following cookout. If you want to reduce work later on, try spraying the actual grill with oil before you decide to cook to really make it more non-stick. In addition, if the coal area is looking tired, add a thin coating of sand which will safeguard this. Don’t forget to cover your bbq or put it in the shed if you have 1. You will be grateful you did whenever you roll it looking all gleaming for the next time.
At BBQbarbecues you can view our whole range and other services that we do such as Gas BBQs, Charcoal Barbecues, Patio Heaters, Wood Fired Ovens and Patio Heaters.
Article Source: http://EzineArticles.com/?expert=Anthony_P_Langston
http://EzineArticles.com/?Thoroughly-Clean-Your-Barbecue-Top-to-Bottom&id=5324050
Choosing Your Smoker and Salt Cellars
Halloween BBQ + Through The Grinder GrateTV
All about Scale and Its a Twist Off


