• Skip to primary navigation
  • Skip to main content
  • Skip to primary sidebar
  • Skip to footer
  • Big Book of BBQ Tricks
  • Resources
  • Free E-CookBook / Newsletter
  • Smoking Meat 101 Book
  • BBQ Blueprint Book
  • Electric Smoker Cookbook
  • Wood Pellet Grill Smoker Book
  • Temperature Guide
    • Seafood
    • Pork
    • Poltry
    • Beef
  • About Me
  • Shop
  • Sitemap

Barbecue Tricks

BBQ Tips and Tricks

Burger

April 27, 2014 Featured

Ten Burger Tricks and Tips – Lid Up or Down?

burrgerr

hamburger tricks

Burgers are a summertime staple in the USA.   Everybody can handle ’em.   Still – your cook out might just go a bit smoother when you are ready to take on the grill with these quick tips and tricks for America’s favorite BBQ food.

1–Keep it Together…Make your patty out of
good ground beef
.  Use some egg and bread crumbs too.  Not only will it add flavor and moisture but it will help the beef hold together.

2–Chill Out.   Pop the patty in the freezer or fridge for fifteen minutes before hitting the grill  The chill will also help em hold together.

3– The Dent.  You can help keep the patty from balling up by starting with a little dent in the center of the burger.   When the meat cooks the dent will diminish and you’ll have a flatter patty.

4—Plan Ahead.   Have all your supplies on hand.  Think through it before you put the meat on the fire.  A trip back
to the kitchen could mean disaster if there’s a flareup when you are gone…

5- Keep It Clean.   Start with a clean grill – fire it up, brush it clean… oil with towel.   The grill bits left over from Labor Day’s cookout are not flavor this time around!

6–Check Yer Lid.   Lid up?  Or down?… the rule is if the meat is thicker than your palm close the lid.  If thinner… keep your eye on it.

7 – Keep it simple.   Don’t over season.  But DO add a secret ingredient to a few patties for fun and conversation.

8–Get Cheesy.   Add the cheese at the very end…  I use Kraft American singles.

9–Is It Done Yet?  Go medium well.   It’s best to use a thermometer.  Should read about 140 in the middle of the thickest part of the meat.

10–Let It Rest — When you’re done… let it rest.   Cutting or biting in too soon will allow the savory juices to drain out onto the plate.  Plus the cheese is HOT!  Let it rest 15 minutes  it’s tough but  it’s worth the wait.

February 18, 2013 Featured

Here’s What You BBQ on President’s Day

red white and blue burgerThis week GrateTV goes all patriotic on us and salutes the Oval office with a round sandwich. Enjoy the holiday and subscribe on iTunes and all the feeds at http://GrateTV.com

December 4, 2011 Butcher's Guide

Grinding Meat at Home – Burger Tricks and Tips

burger pattyHow To Make Burger With A Grinder

By Matt LeClair

Thinking about making your own beef, venison, pork, turkey, or chicken burger? One way that you can do it is with a meat grinder. The process of making your own burger with a grinder is actually pretty simple. Here are the steps:

Prepare The Meat

The first step involved in the process of making burger with a grinder is preparing the meat. In most cases you’ll start out with a large chunk of whatever type of meat it is that you are grinding. You need to cut this large piece of meat into small 1 inch by 1inch cubes. If you prefer, you can make the cubes a bit larger to save time since this step can be quite time consuming.

Large pieces of meat have to be cut into smaller chunks so that they can be fed through the grinder without causing it to back up. Not only does doing so help keep your grinder running smoothly, but it also helps speed up the process by not causing you to stop intermittently.

The Grinding Process

Once you have the meat the you would like to turn into burger prepared, the next step of the process involves feeding it through the grinder. For this step you can use an actual meat grinder or you can use a KitchenAid with a meat grinder attachment. While the KitchenAid won’t work as well as an actual grinder, it will still help you get the job done.

The grinder is equipped with a top loading tray where you will place the meat that you intend to run through the grinder. When ready, load a handful of meat chunks onto this loading tray, turn the grinder on a low to medium speed, and then begin feeding the meat into the grinder with the feeding tool. A few things to keep in mind before you being this process: make sure you have a bowl or some sort of container to catch the meat as it comes out of the grinder, and be sure that you have the right blade attachment for making burger. There are a number of different blade attachments that can be used to grind, mince, and slice meat as it is fed through, so you want to make sure you’ve got the right one for making burger.

Press the meat down into the feeding tube until all of the meat has been fed through the grinder. Continue on by grabbing another handful of meat and placing it in the loading tray. Repeat the process of loading and feeding meat through the grinder until all of the meat has been processed.

Packing and Storing The Burger

The final step in the process of making burger with a grinder involves packing and storing the burger once it has been through the grinding process. One of the best things you can do to extend the shelf life of your burger is pack and seal it using a vacuum sealer. Doing so will remove air from the packaging and keep the burger in an air-tight environment where it is protected from freezer burn and harmful bacteria.

Thinking about getting yourself a meat grinder? Learn about popular meat grinders at http://infomedley.com/meat-grinder/.

Article Source: http://EzineArticles.com/?expert=Matt_LeClair
http://EzineArticles.com/?How-To-Make-Burger-With-A-Grinder&id=6728758


February 23, 2009 Featured

Burger Made Better Trick

I saw one of those Food Network stars making burgers last week and I saw one tip you have to try. The chef claimed that when you make your own hamburger patties of ground beef for grilling you could use his trick to keep the thick – disk shaped – patty from turning into a fat – ball shaped – patty.

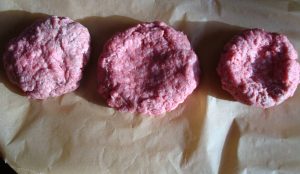
The advice is to make your patty with an indentation in the center (see photo). That way when the center of the beef patty swells or plumps when you grill it, the burger will revert back to a normal / flatter patty shape that will nicely accommodate a soft bun. Simple enough.

We tried the technique in the BBQ test kitchen and must say were surprised at how well the “indentations” on the test patties disappeared. We probably could have made the dent evendeeper (or on both sides). The control patty (“test” or “not concave” is on the left in the photos) indeed DID expand in the middle… But honestly not enough to bother me.

Another recommendation would be to control yourself and keep from pressing the burger down on the grill with the spatula. I don’t know why guys do this but I see it done all the time.

All-in-all the tip is worth while and is good general practice for the next time you’re pressing patties.

Primary Sidebar

Welcome To BBQTricks!

Hey Y'all... Thanks for stopping by. I'm Bill West. I blog about BBQ and occasionally country music. When it comes to BBQ I try to find solid time saving tips and tricks to make the grilling life a bit easier. It's life hacking for the backyard cooker. Read More…

Your Gateway to Barbecue Information

This site is a member of The Smoke Ring BBQ Webring A linked list of BBQ websites

Next BBQ Site - Next 5 BBQ Sites - Prev BBQ Site - Random BBQ Site

Join the BBQ ring or browse a complete list of The Smoke Ring BBQ Webring member's BBQ sites

If you discover problems with any of The Smoke Ring BBQ Webring sites, please notify the Ringmaster

fb

Footer

DISCLOSURE:

Posts on this site may contain affiliate links. If you purchase something via one of these links you won’t pay more but the site operator gets a small commission. Or as I like to call it: “beer money.”

Copyright © 2025 — Barbecue Tricks • All rights reserved.