• Skip to primary navigation
  • Skip to main content
  • Skip to primary sidebar
  • Skip to footer
  • Big Book of BBQ Tricks
  • Resources
  • Free E-CookBook / Newsletter
  • Smoking Meat 101 Book
  • BBQ Blueprint Book
  • Electric Smoker Cookbook
  • Wood Pellet Grill Smoker Book
  • Temperature Guide
    • Seafood
    • Pork
    • Poltry
    • Beef
  • About Me
  • Shop
  • Sitemap

Barbecue Tricks

BBQ Tips and Tricks

Tricks

October 19, 2012 Featured

The Money Muscle Secret

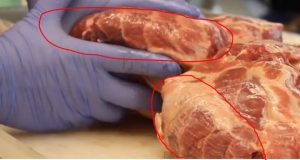
Two Pork Butts with Money Muscle circled. Note fat stripes.


It’s a BBQ secret weapon.  If you’ve ever judged a BBQ contest you may be familiar with what’s called “the money muscle.”  Using it in a judged box is a bbq trick that has become well known.

It’s named “money muscle” because a lot of competitive cookers think it’s the best tasting part of the Boston Butt (or pork butt) and is essential on winning the top level money in pro cook-offs.

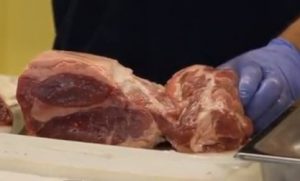
How do you find the money muscle? Look at the opposite end of the bone.  It’s tube shaped (with striations and stripes).  You’ll see the bands of fat evenly spaced along the muscle.  When fully cooked that fat should easily melt away and render to provide almost a mini loin that cookers will slice and present in a blind box for competition.       It’s located high on the pork shoulder (read “high on the hog”) and is the beginning of the loin.

That muscle just doesn’t get worked much so it’s super tender.

money muscle

Butt with Money Muscle trimmed for competition cooking

Cookers will also promote bark creation around the money muscle by trimming around the muscle and using a good rub.  Some competitions will disallow full separation from the rest of the but while cooking so often it is carved so  it is still connected.

“You have to trim it up so it’s nice and round and it’s kinda like a little loin.  The great cooks really use that muscle to really showcase their meat” according to champion Pitmaster Jack Waiboer.

The money muscle will cook faster than the rest of the butt (shoot for 180 degrees for the muscle 195 for the rest of the butt).  Once done, the log shaped muscle can be sliced into medallions and presented beautifully in the turn in box.   The addition of a good bark on the succulent meat is a combination that wins over judges (especially in the tenderness category).

See more about the money muscle on THIS Episode of GrateTV
 

September 30, 2012 Tricks

Fastest Pork Pulling

Watch this South Carolina Cooker make quick work pulling a 15 pound whole shoulder in 30 seconds.  Impressive tool.

August 12, 2012 Cook

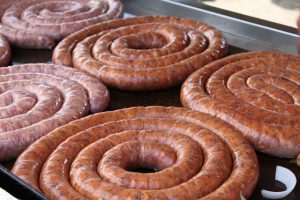
Italian Sausage BBQ Tips and Tricks

sausage bbq

Photo:flickr.com/daveynin

Celebrating The Art Of Grilling With Italian Sausages
By Siddhesh Ramesh Jadhav

For most Americans, grilling evokes a series of relaxing images in the mind. Picture this – a group of friends in the backyard, waiting impatiently while the barbecue is sizzling away and the air is filled with appetizing aromas of food. Their wait is worthwhile because very soon, they will dig in happily into some delicious grilled meat!

Nothing symbolizes the spirit of America more than firing up the grill with family and friends on the Fourth of July. Grilling represents a great American cooking tradition that has taken years to evolve – from the ancient meat-on-a-stick over raw fire to the culinary delights cooked with modern grills.

When it comes to cooking their favorite meat, Americans prefer grilling to other forms of cooking. Grilled meat is juicier and acquires an irresistible taste and aroma that cannot be substituted with any other. Grilled food is also healthier since its fat content is considerably lower. As of 2011, 82% of American households own a grill or smoker and nearly 40% grill all year-round.

Burgers, steak, hot dogs, chicken and pork chops are the most popular foods cooked on a grill. Grilled Italian Sausage recipes are also a favorite at cookouts. There are countless mouthwatering dishes that can be prepared with Italian Sausages. Surprise your friends and family by tossing some Italian sausages on the grill. Let the aroma of these sausages provide a beautiful setting for your evening.

Grilled Italian sausage recipes are abundant and your cooking abilities will be rewarded with any recipe that includes Italian sausages:

� With your choice of bread or bun along with relishes and condiments

� As the main course with side dishes

� Combining it with pasta or vegetables

� Or simply grill and have them on their own!

Things to keep in mind when grilling sausages

Fire the grill, toss on a couple of sausages and cook till they look right. Simple, right? There’s actually more to it. It is important that you not just grill right, but also retain the flavor and avoid total drying of the casing. Three simple rules that should be remembered for every grilling are:

  • Believe in slow and gradual heating: Sausages tend to shrivel up as they are grilled. It is important that you do not immediately expose sausages to high heat, since the outer casing will crack open immediately, releasing meat and fat onto your fire-called ‘spitting’-and this will cause it to flare up. This chars the sausage and leaves a sooty deposit all over your sausage.
  • Say NO to forks: Instead of a fork use tongs or a spatula to turn food. Piercing sausages with a fork releases fat and juices onto the hot coals, causing flare-ups.
  • Use only white/grey charcoal: Grill only over grey-white coals after flames have died down and not over black coal. Gas grills should be set on the lowest or medium setting depending on your requirement.

We recommend a few delicious recipes, like- Italian Sausage Sandwiches, Sausage Skewers and Premio’s Bacon Wrapped BBQ’ED Sausage with Sauerkraut.

Article Source: http://EzineArticles.com/?expert=Siddhesh_Ramesh_Jadhav
http://EzineArticles.com/?Celebrating-The-Art-Of-Grilling-With-Italian-Sausages&id=7221747


July 15, 2012 Featured

Corn Shucking Trick


Corn on the cob can be a hassle to get clean and free from silks.   Here’s a quick trick to get each cob super clean and – since this is Barbecue Tricks it’s nice to free up the grill for the meat!   Take a look.

cobUse a sharp knive and chop the bottom – rounded ends off each cob.   Keep on the husk and all.  Then give each cob… husk, silks and all a 4 minute zap in the microwave.  Add four minutes for each additional cob.

After heating you should be able to slowly (carefully with gloves – it’s HOT) squeeze out the cob.  Take a look at the two minute corn husk shucking video to see it in action.

July 6, 2012 Featured

Clay Pot Sculpted Chicken

clay sculpted chicken


Ever sculpt your dinner?

Here’s a dramatic way to present BBQ chicken that bakes in all the flavor and adds a fun exclamation point to the start of the meal.   Imagine presenting a guest with a clay sculpture of the chicken he or she is about to eat.   They bust it open and have a succulent chicken ready to eat.    Super fun.  Jack Waiboer and GrateTV took a look at this technique done up with a flourish at the 2012 Bovinova in Greer, SC.   Also inspired by a Saveur article we dug up here.

GrateTV is our weekly BBQ and Grill show hosted by Jack Waiboer from http://carolinapitmasters.com and Barbecue Tricks founder Bill West.


March 22, 2012 Featured

Grilling Bacon Tricks

Bacon Grill

Photo:Flickr/sjsharktank

The Art of Grilling Bacon Wrapped Food
By Bobby Frankel

One of the techniques one needs to master before becoming a barbecue professional is how to grill bacon wrapped foods. Bacon is used to wrap seafood (shrimp and scallops), vegetables (cheese stuffed peppers) and meats such as filets of beef and pork. Wrapping boneless and skinless stuffed chicken thighs in bacon is also gaining popularity. However grilling bacon wrapped foods is not a straightforward endeavor. The two biggest challenges you face when grilling bacon wrapped foods is preventing grease fires and getting the bacon finished at the same time as the food it is wrapped around.

Grease fires are extremely common when cooking bacon wrapped foods. If dripping bacon fat comes into contact with lit charcoal or propane flames them a flare up fire is inevitable. The easiest way to deal with situation is to always cook bacon wrapped food with indirect heat. If the bacon is not directly over a heat source then the probability of a grease fire is greatly minimized. When grilling with indirect heat it is a good idea to use a disposable aluminum drip pan underneath the food. The foil pan will catch any grease and make subsequent clean up much easier.

Once you have taken steps to minimize grease fires you can start working on getting your bacon to cook at the same rate as the food it is wrapped around. This is most easily accomplished by using thinly sliced bacon instead of the more expensive thick cut varieties. This is not as important if you are grilling food that takes 20-30 minutes to finish such as pork tenderloin but is critical if you are working with quick cooking foods like shrimp and scallops.

A second trick to employ with quick cooking food is to partially precook your bacon before wrapping. You can put a few slices of bacon in paper towels and microwave on high for one minute to get you bacon about halfway done cooking. The only drawback to this approach is that it is easy to overcook the bacon which makes it extremely difficult to wrap around your food. A better approach is to blanch the bacon in boiling water for one minute. The blanching approach takes a little more work but helps make sure the bacon remains pliable enough to use as a wrapper.

The final tip for grilling bacon wrapped food is to pay particular attention to your seasonings. Most bacon has a very high salt content. This means that the amount of extra salt you use to season your food should be kept to a minimum.

With a little practice you can avoid grease fires and get your bacon cooked at the same time as the food it is wrapped around. Master these skills and you are one step closer to becoming a grill master.

I am an avid griller who loves to write! I run web sites about Weber grills and pork tenderloins because that’s just the sort of thing I enjoy. I invite you to visit my other sites and take a look!

Article Source: http://EzineArticles.com/?expert=Bobby_Frankel
http://EzineArticles.com/?The-Art-of-Grilling-Bacon-Wrapped-Food&id=6945314


January 7, 2012 Cook

Beer In The Rear Turkey 25.4

Resting Turkey

Beer In The Rear Turkey

Turkeyon a grill or smoker can be tricky.    It’s easy to get rubbery skin (and that can actually make some people mad).  There’s a lot of expectation on a Thanksgiving dinner especially with skin lovers.

Beer in the Rear Turkey is almost fool proof.  It’s quick and give you a crisp golden skin with a hint of smoke.

The first time I heard about the beer can trick was around 1999 when my morning radio hosts became enamored with a recipe they found called Beer Butt Chicken.  They thought it was so great (probably just liked that the word Butt was in a recipe) they wanted to bring a grill to the radio station and demo it in the parking lot.   I’ve grown to like it too.  So it’s fun to be able to super size the recipe.

This time the poor thing gets violated with not just a regular beer can but you use the big “Foster’s Lager” sized can of beer. You can find it in most grocery stores.   Reserve half and enjoy as you prep.  You’ve earned it. You’re going to want to punch some holes in the top of the can and put some spice rub in the can.  And then you get to the bird…where you clean off the bird really well and make sure you get all the different things out of the inside of the cavity of the bird.  They hide it in different areas… the neck, the gizzards…

Beer Butt Turkey

Caution: It's harder to REMOVE the can...

With the bbq spice rub inside the can… the steam and the beer flavoring will actually steam through the turkey and infuse it with a really super flavor keeping the bird moist from the inside out. You’re not going to get much from the outside-in because the skin of a turkey is kind of like a wet suit.    Rub the spice under the skin (I call this getting to second base with the Turkey).  The skin is really pretty resilient and thick so you’re not going to damage anything.

Then you just insert the can upright inside the bird.     Carefully lower the turkey on top of the can making kind of a tripod of sorts.    If you need a little extra room on the grill you may want to remove the bottom grill grate and put the tripod on a small roasting pan actually on the floor of the grill directly on the burners of the gas grill.  You won’t  actually turn the burners on under the bird.   Set up for indirect grilling heat.  Temperature is going to be 325 to 375 (if you have a temperature gage on  your gas grill – use it this time).    You can usually get this temp/indirect by having one or two gas burners on and the other two off.

To get a lick of smoke use some wood chips in a smoker box on he lit burner or using a tin foil pouch.  Making a smoker pouch really easy.  Then and then just let it cook.

After about an hour – open it up turn the bird around let it cook for another hour or until it gets golden brown on both sides.   Use a meat thermometer in the thickest part of the thigh and cook until you hit at least 160 degrees.

You’ll  want to use gloves and be super careful removing that can.   The liquid is dangerously hot and the can is greasy! Let rest before carving.


Beer In The RearTurkey

In the video demo we used an 11.75 lbs turkeyand cooked for two and a half hours (150 minutes). Approximately 345 degrees Indirect heat.

“Discard” half of the beer.    Add 2 tablespoons Rub into remaining liquid in can.   Using a “churchkey” can opener add additional holes to top of can.  Insert upright under and inside turkey using legs as tripod support.  Grill over indirect heat 2 to 3 hours until temperature measures 160 degrees in the thickest part of the thigh.  Let rest  before carving serving.

Ingredients:

1 wholeTurkey(10 to 18 lbs.)

6 tablespoons of BBQ Rub or Greek Seasoning

1 can Fosters Lager (or 25.4 oz other)

December 4, 2011 Butcher's Guide

Grinding Meat at Home – Burger Tricks and Tips

burger pattyHow To Make Burger With A Grinder

By Matt LeClair

Thinking about making your own beef, venison, pork, turkey, or chicken burger? One way that you can do it is with a meat grinder. The process of making your own burger with a grinder is actually pretty simple. Here are the steps:

Prepare The Meat

The first step involved in the process of making burger with a grinder is preparing the meat. In most cases you’ll start out with a large chunk of whatever type of meat it is that you are grinding. You need to cut this large piece of meat into small 1 inch by 1inch cubes. If you prefer, you can make the cubes a bit larger to save time since this step can be quite time consuming.

Large pieces of meat have to be cut into smaller chunks so that they can be fed through the grinder without causing it to back up. Not only does doing so help keep your grinder running smoothly, but it also helps speed up the process by not causing you to stop intermittently.

The Grinding Process

Once you have the meat the you would like to turn into burger prepared, the next step of the process involves feeding it through the grinder. For this step you can use an actual meat grinder or you can use a KitchenAid with a meat grinder attachment. While the KitchenAid won’t work as well as an actual grinder, it will still help you get the job done.

The grinder is equipped with a top loading tray where you will place the meat that you intend to run through the grinder. When ready, load a handful of meat chunks onto this loading tray, turn the grinder on a low to medium speed, and then begin feeding the meat into the grinder with the feeding tool. A few things to keep in mind before you being this process: make sure you have a bowl or some sort of container to catch the meat as it comes out of the grinder, and be sure that you have the right blade attachment for making burger. There are a number of different blade attachments that can be used to grind, mince, and slice meat as it is fed through, so you want to make sure you’ve got the right one for making burger.

Press the meat down into the feeding tube until all of the meat has been fed through the grinder. Continue on by grabbing another handful of meat and placing it in the loading tray. Repeat the process of loading and feeding meat through the grinder until all of the meat has been processed.

Packing and Storing The Burger

The final step in the process of making burger with a grinder involves packing and storing the burger once it has been through the grinding process. One of the best things you can do to extend the shelf life of your burger is pack and seal it using a vacuum sealer. Doing so will remove air from the packaging and keep the burger in an air-tight environment where it is protected from freezer burn and harmful bacteria.

Thinking about getting yourself a meat grinder? Learn about popular meat grinders at http://infomedley.com/meat-grinder/.

Article Source: http://EzineArticles.com/?expert=Matt_LeClair
http://EzineArticles.com/?How-To-Make-Burger-With-A-Grinder&id=6728758


November 6, 2011 Cook

Grilled Fish on Your BBQ

Credit: John Harvey / Wikipedia

How to Cook Fish on the Grill By Brent Nelson

Grilling is an ideal way to cook fish, producing quick, easy and delicious results. In most cases, you can watch it happening before your eyes, and pop it onto a (warmed) plate the instant it is cooked to perfection. As pretty much any fish of a suitable size can be grilled, these guidelines should help you whatever your choice.

As there are far too many species to consider for this short article, your main choices can be broken down into flat fish, round fish, and oily fish. Then you can chose to have the fish filleted or cooked on the bone. Large fish can, of course, be cut into suitable sized portions, again on or off the bone.

If there is a secret to successful fish cookery, it is to cook the fish for as little time as possible. Fish needs to be heated through just until the point the flesh has “set”; cook any further and you lose moistness and flavor. We are usually talking just minutes here.

Some fish need scaling, and some need to have the skin removed before cooking. If you are not sure, ask your fishmonger, and they will prepare it for you. Even if the skin is inedible it is often better to leave it on while cooking, after which is will easily peel off, or you can just eat the fish from it and leave it on the plate.

If you are cooking whole round fish, such as herring, bass, trout etc, cut a few diagonal slashes in the flesh, right down to the bone, just before cooking. This helps the heat penetrate so that the fish can cook evenly.

The final consideration before you begin cooking is simply how thick is your fish? A thin fillet of sole will obviously cook much more quickly than a thick tuna or cod steak, for example. The basic rule is the thicker the fish, the lower the heat, or the further away from the grill.

    • If it needs it, oil the fish, not the pan or grill. Season liberally with good salt and freshly ground black pepper, and by all means rub in some chopped herbs if you like them.


    • Pre-heat the grill before you start to cook – wait until it is at the full required operating temperature.


    • If cooking filleted fish, place the skin-side toward the heat first (unless, of course, you have had the fish skinned).


    • Indicators that the fish is ready are when the skin starts to slightly char and become golden, or the flesh becomes opaque rather than translucent at the thickest part, or that the flesh can be easily pulled from the bone.


  • Turn, if necessary to finish the other side – it will generally not take as long as the first side.

Fish, when grilled simply, is so delicious that it rarely needs elaborate or fancy sauces – often just a little melted butter or a squeeze of lemon is the perfect finish.

Brent Nelson writes The Guerilla Griller, one of Europe’s top 500 food blogs. On a mission to demystify food and cooking, with clear step-by-step recipes, and here for the newbie and experienced cook alike. Find The Guerilla Griller at: http://guerillagriller.blogspot.com/

Article Source: http://EzineArticles.com/?expert=Brent_Nelson

http://EzineArticles.com/?How-to-Cook-Fish-on-the-Grill&id=6654004


October 15, 2011 Featured

5 Grilling Tips To Make Your Cookouts Rock

Grill

BBQ or Grill

By Jason Westwood

It doesn’t matter if you are grilling over charcoal or gas… if you want to make your cookouts rock then you need to master some basic skills first. I have seen many people who love to grill but just don’t know how so I figured I would take some time to talk about some things that can help them go from an amateur to a grill master. Keep in mind that these are only 5 things that you can improve on but there are many more. After you start getting the hang of things you will learn more and more techniques that you can use, but for now let’s just start with some basics.

Avoid Lighter Fluid Like The Plague

If you have a charcoal grill and use lighter fluid to get it going then you are probably not going to agree with me here. The truth is though that lighter fluid gives your food a sort of chemical taste and if you did not use it you would notice an increase in flavor in everything that you cook. Instead try using a chimney starter to light your grill. These are really cheap and can save you a lot of money in lighter fluid over the course of a year so they are definitely worth the investment. I find that this gadget is an essential tool for any avid griller and the coals get hotter and cook food much better thus making you look and feel more like the grill master you are.

Keep Your Grill Surface Clean

This is very important because without a clean grill surface to cook on, food will stick to it and it will make it harder to flip things like burgers and chicken. You also won’t get the great looking grill marks on your meat that you would with a clean grill grate. This is an easy fix though and one that can make your food really stand out. To clean your grill properly you just have to heat up the grill surface and scrape it clean with a wire brush or grill stone. I personally like using the grill stone because I think that it cleans better, but it depends on the grill grates you are using. Just make sure that the surface is clean before you start cooking and you will look like a pro.

Don’t Squish The Burgers!

One thing you will see many people doing is squishing down their burgers as they grill them. This is a bad thing to do as you can imagine because it lets all the juices escape the meat and get burned up by the flames. Not only does this make a burger dryer then a piece of old shoe leather, but it also causes flare ups which can char your meat and make it look like a burnt piece of old shoe leather as well. Instead you should only flip your burger once during the cooking process and then leave it alone until it is ready to come off the grill. This works very well and will keep the juices locked in your burger which will make it taste much better.

Avoid Poking Holes In Your Steak

Like the above tip, poking holes in your steak is a bad move because it allows the juices to drip out instead on keeping them locked in. People usually do this with a fork or other utensil when they go to put it on the grill or flip it. You will be much better off using a set of tongs. Every griller should have tongs and a good spatula in their toolbox anyway because it helps out quite a bit and really separates the pros from the amateurs.

Keep An Eye On The Heat

Heat can be your best friend or your worst enemy. You can easily overcook a steak by leaving it over to high of heat for too long so you will really need to watch the heat. At the same time you will need to make sure that you have enough heat or your food will come out undercooked. There is a balance and you will have to do some experimenting to find it but once you do you will know because your food will come out just the way you want it.

This article turned out to be a little longer than I expected but I hope that you got a lot out of it. There is a lot more to grilling then I mentioned here though so if you are really serious about learning to grill you may want to check out www.avidgriller.com where you will find more tips and tricks to help you out. Lately I have been cooking some great things on my Weber Genesis e-310 and I will be sharing some recipes real soon so be on the lookout for that as well.

Article Source: http://EzineArticles.com/?expert=Jason_Westwood
http://EzineArticles.com/?Top-5-Grilling-Tips-To-Make-Your-Cookouts-Rock&id=6607813


  • « Go to Previous Page
  • Page 1
  • Interim pages omitted …
  • Page 4
  • Page 5
  • Page 6
  • Page 7
  • Page 8
  • Interim pages omitted …
  • Page 10
  • Go to Next Page »

Primary Sidebar

Welcome To BBQTricks!

Hey Y'all... Thanks for stopping by. I'm Bill West. I blog about BBQ and occasionally country music. When it comes to BBQ I try to find solid time saving tips and tricks to make the grilling life a bit easier. It's life hacking for the backyard cooker. Read More…

Your Gateway to Barbecue Information

This site is a member of The Smoke Ring BBQ Webring A linked list of BBQ websites

Next BBQ Site - Next 5 BBQ Sites - Prev BBQ Site - Random BBQ Site

Join the BBQ ring or browse a complete list of The Smoke Ring BBQ Webring member's BBQ sites

If you discover problems with any of The Smoke Ring BBQ Webring sites, please notify the Ringmaster

fb

Footer

DISCLOSURE:

Posts on this site may contain affiliate links. If you purchase something via one of these links you won’t pay more but the site operator gets a small commission. Or as I like to call it: “beer money.”

Copyright © 2025 — Barbecue Tricks • All rights reserved.