• Skip to primary navigation
  • Skip to main content
  • Skip to primary sidebar
  • Skip to footer
  • Big Book of BBQ Tricks
  • Resources
  • Free E-CookBook / Newsletter
  • Smoking Meat 101 Book
  • BBQ Blueprint Book
  • Electric Smoker Cookbook
  • Wood Pellet Grill Smoker Book
  • Temperature Guide
    • Seafood
    • Pork
    • Poltry
    • Beef
  • About Me
  • Shop
  • Sitemap

Barbecue Tricks

BBQ Tips and Tricks

Featured

March 27, 2010 Featured

BBQ Breakfast On the Grill

Breakfast Eggs: Griddle Required!

By Marjorie Bill

Summer time mornings are the best! The air is clear, clean and warm. Why not get out of the kitchen and cook breakfast outside on the grill? Food always seems to taste better when made on the grill and breakfast is no exception. Here are a few ideas to get you started.

Traditional bacon/sausage and eggs and toast:

Use the griddle plate on the grill. One with ridges that allows the grease to flow away and collect away from the food is best. Preheat the grill and cook your bacon/sausage and eggs just as you do on the stove. Toss a slice or two of buttered bread on the griddle at the last moment and enjoy your in house breakfast cooked outdoors. Because there is grease involved watch to make sure there are no fire flareups and remove grease as necessary.

Next is something a little more fun:

Place a thin ham slices in muffin tins, and top with a mixture of beaten eggs, salt, pepper, 1/4 cup milk, chopped onions and peppers. Top with shredded cheese. Place muffin tin in aluminum pan that has about 1/4 cup of water in the bottom. Cover the pan with foil and cook on low heat until egg is set. Approximately 45 minutes.

How about some BBQ fruit to get you energized for a morning walk:

Grilling fruit is very easy to prepare but there are a few things you should do prior to placing it on the grill. First make sure your grill is clean. You do not want the left over burnt bits of last night’s dinner to be mixed with the fresh fruit you will be grilling. Firmer fruits like, pineapples, pears, apples and even bananas work best. They should be firm, fresh and solid so they will hold together will grilling. Leave the peels intact as it will also help hold the fruit together. Slice the fruit into large slices and cut the bananas in half lengthwise. After cutting the fruit soak it in water so that it will absorb as much liquid as possible and stay juicy will grilling. Completely cover the fruit in cold water and add 1 teaspoon of pure lemon juice to the water to help the fruit retain its natural color. Let the fruit soak for 30 minutes adding ice as needed to keep the water cold. Adding spices such as cinnamon to the water gives the fruit a touch of spice flavoring.

Drain the fruit and coat lightly with a mild oil or melted butter to keep it from sticking to the grates. You can also add spices such as ginger, nutmeg, allspice or cloves to the melted butter prior to coating the fruit to spice it up some more. Grill the fruit, on a preheated grill, on medium heat. Grill the fruit till heated through and it has the look of lightly grilled food. Remove from heat and serve warm.

Now that you know how easy it is to make breakfast on the grill. Get out the grill and start your day outside with a meal in the fresh morning air.

Please visit grills to find more fun recipes and to learn about tips and tricks for electric grills visit electric grills. Summer is here and its time to enjoy your grill!

Article Source: http://EzineArticles.com/?expert=Marjorie_Bill

http://EzineArticles.com/?Breakfast-on-the-Grill&id=3966125

March 7, 2010 Competitions

BBQ Pitmasters On TLC

The TLC Show BBQ Pitmasters looks like a blast… They Just released the entire season on BBQ Pitmasters - BBQ Pitmasters, Season 1 - Smokin' In Mesquite…  But here’s a quick clip that’savailable on YouTube plus a link to an entire Barbecue Pitmasters episode.  The show features Myron Mixon and other fantastic cookers.

Full Episode:

http://tlc.discovery.com/videos/bbq-pitmasters-johnny-triggs-shootout-full-episode.html

BBQ Tips:

http://recipes.howstuffworks.com/tools-and-techniques/myron-mixon-jacks-old-south-grilling-tips.htm

Entire Season on iTunes:
BBQ Pitmasters - BBQ Pitmasters, Season 1 - Smokin' In Mesquite

February 26, 2010 Featured

Jim and Nick’s BBQ Worth a Stop

Pork on top, Brisket on the bottom.

Sometimes it seems like the big chains get it all wrong with BBQ.   The more you try to mass produce the more is lost or cheapened in the process.

Not the case with Jim ‘N Nick‘s Barbecue.   After a quick lunch visit last week I can see they are the real deal.  Low and slow prep with fantastic sides and a killer smoke ring too.    Hickory smoked shoulders – low and slow for 14 hours according to the website.

We visited the Jim and Nicks on King Street in downtown Charleston, SC.   The million dollar South Carolina address made me feel like we were in the barbecue capital of the world.     In fact,  Jim ‘N Nick’s is in over seven states and almost 30 locations.  It’s a big operation with a nice hometown feel.     Love the neon pig sign out front.

They claim “Scratch Made Everything” and it tastes legit.  I had a feast of the “Double Decker” featuring some pulled pork on top and beef brisket on the bottom.   I savored picking apart each level and noted a strong red smoke ring on both the pork and the beef.   As usual I preferred the spicy version of their sauce… but would have been happy with a little less butter on the bun.  It didn’t stop me.

The Cheese biscuits will make me come back...

All the sides were good but the basket of cheese biscuits they served (and re-filled) were the best.   At first I thought it was a special cornbread with it’s substantial heft.  But it sounds like the biscuits are one of the claims to fame.    Make sure you try ’em.

We also sampled a variety of tacos (they feature Taco Tuesdays at some locations) with a good dose of pico and cilantro along with the pulled pork.  Another winner.

We left stuffed and happy with a few items still to try.  Next time ribs and onion rings.

With the memory of those Cheese biscuits still in my head I decided to search for a good recipe to mimic them and lo and behold there are a few copycats out there.    I’ll pass along this step by step from the Gastronomy Blog worth a mention for the great photos.

Great Curb appeal in Charleston

January 18, 2010 Featured

Essential Ingredients For BBQ

By Aaron M Walker

Slather It On...

Slather It On...

When exploring how to BBQ with perfection you will need to know the many essential flavors of various types of BBQ meats. I personally feel that simplicity is usually best. Too many contradicting flavors can take away from the flavor of the meat and will likely overwhelm your taste buds. With barbecue, the woods used during the cooking and the seasonings used for rubbing and marinating the meat should add flavor but not be over powering.

Among the more frequently used BBQ woods you will find apple, cherry and maple barbecue smoking chips. I like to have a few varieties available. I also am always sure to have on hand what I feel are the essential BBQ seasoning, spices, and basting products. These items can be used in various combinations based on your personal preference. Making your own BBQ rubs, brine, and barbecue sauces for any of your favorite meats will be quite easy if you keep the following list on hand.

Basting & Sauce Ingredients:

Apple juice: This is Ideal for basting any BBQ meat and especially useful for ribs, pork butt, and chicken. Apple juice and apple cider can often be used in many brine recipes, bbq sauces, injections, or even in the water pan to keep the meat moist.

Rub it in... Rub it in...

Rub it in... Rub it in...

Apple cider vinegar: This is a great ingredient for BBQ sauces and mops. You may also use it to thin store bought sauces and make a quick and simple mop or marinade. This is also a great product for dressing bbq pulled pork.

Molasses: This is used primarily for making sauces. The bold flavor and dark color gives the sauce its thick texture an dark color. Molasses and apple cider vinegar are 2 key ingredients I use in my personal sauce recipes.

Whiskey or Bourbon: Using these can bring great malt flavor and help to add balance to your mops or sauces. Try a bottle mixed with half Jack Daniel’s and half apple juice for basting BBQ meats.

Brown Sugar: This is another essential ingredient in my own barbecue sauce recipes. This is a great way to bring a subtle sweetness to pork butt, chicken, ribs, or pulled pork dishes. Brown sugar blends very well with hot or spicy flavors to give you just a touch of sweetness in your hot and spicy sauce.

Seasonings and Spices:

Onion powder: This is one of my personal preferences of ingredients for my BBQ rubs. The onion flavor works well with any BBQ meat.

Cumin: This is among the most important ingredients for BBQ rubs and chili recipes. This ingredient will bring a slight smoky flavor and it is especially good for a pork BBQ.

Paprika: The primary ingredient found in virtually all BBQ rubs as well as chili recipes. This adds a great color and flavor to any BBQ meat and the subtle flavor helps to balance the other ingredients.

Chile Powder: This flavorful blend can be used on any BBQ meat. This is a great way to add some spice or heat to your BBQ meat.

Garlic powder: One of the major ingredients in my personal recipes of BBQ rubs and sauces. This adds a subtle sweetness along with a touch of heat and brings balance to spicy flavors.

Kosher salt: I personally don’t care for a really salty taste. This salt helps to bring out the actual flavor of BBQ meats and has a much more subtle flavor than regular salt.

Black pepper: A very important part of any seasoning blend to get that hot and spicy touch. The bold flavor and peppery fragrance makes any BBQ meat better.

The truth about BBQ is that personal preference dictates the end result more than anything else. Practice with the flavors you enjoy and try different combinations of seasonings. You will find some you like and some you don’t but, ultimately you will enjoy the journey to find your BBQ perfection. The last and most important tip here is “cook low and slow”. This simply means use a temperature of 325 degrees or less (275 – 300 degrees is best) and cook for a longer period of time. Always make sure the temperature is constant and keep you water pan full so the meat doesn’t dry out. You can even BBQ in your oven at home during the winter if you think it is too cold to fire up the grill. Making BBQ in the oven will follow these same guidelines but for wood or smoke flavor you want to use a liquid smoke product rather than wood chips.

View this and other articls on HubPages at http://hubpages.com/hub/BBQ-With-Perfection

You can also follow my RSS Feed by clicking here http://hubpages.com/author/Has_aWayWithWords/latest/?rss

hubpages.com/profile/Has_aWayWithWords

Article Source: http://EzineArticles.com/?expert=Aaron_M_Walker
http://EzineArticles.com/?Essential-Ingredients-For-BBQ&id=3575631

January 3, 2010 Featured

Beef Brisket Step By Step

BBQ Beef Brisket worth the all day cook.

BBQ Beef Brisket worth the all day cook.

It was a wet Christmas Day but nothing would get in the way of an appointment I had with a 6.5 lbs. beef brisket set to feed family visiting for the holiday.

The key to brisket – I determined – is simply time.    Cook’s Illustrated (a favorite reference) writes about how to trick the process and only truly “smoke” the beef on a grill or smoker for a mere two hours and then finish off the brisket (wrapped in foil) for an additional number of hours at 300 degrees.   They say two hours is all you need to provide the smoke infusion.

We love a good BBQ trick or two but this day we kept to tradition. Low and slow over charcoal (we mixed hardwood lump and Kingsford Hickory 70/30) and used water soaked Jack Daniels Whiskey Barrel Oak Chips for smoke. (However Mesquite is a brisket favorite and a better choice).

The process began the night before the cooking by preparing a simple rub and rubbing down the brisket.   Feel free to trim down the fat cap.  There’s no need for more that about a quarter of an inch of a layer of fat.   But you do want some.     We opted to rub the seasoning on/in the fat too.   Then in the refrigerator ’til morning.

The Brisket Rub ( to cover 7 to 9 lbs. Brisket)

1 Packet Taco seasoning (1.25oz – Publix Generic brand)
2 tbl. Garlic Pepper mix (Tone’s)
5 tbl. Brown Sugar
5 tbl. Paprika
5 tbl. Tony Catchere’s Creole Seasoning

Brisket has a “flat” side and a “point.”    The flat looks similar to a flank steak with a long grain.  The point is on top of the flat with a later of fat in between.   The grain runs in a different direction on the point (something to remember when slicing).  We used what would be considered a small  6.5 lbs brisket that was mainly “flat.”     Typical of what you would find in a major supermarket but not mega cookout sized (you can find the biggies -8 pounds and bigger – at Sam’s, Walmart’s, or a butcher).

Time is the big issue.  We put our 6.5 pounder on a Brinkman Smoker at 9:00 am Fat side up.

You don’t want to open the lid of the smoker more than you have to at this point.  Adding chips in the small side door is fine.   Some say every time you now lift the lid you’ll have to add 15 minutes to your cook time.   We added wet wood chips to the coals through the side door every 40 minutes or so until 11:30am.

At 11:30 we raised the smoker off the bottom and added some additional charcoal (1 chimney already hot / white ash) and wood chips, plus added water to the drip pan.

Smoker Temperature should stay between 225 and 275.   The Brinkman smoker has a reading of “Ideal” and I tried to stay at that level until about 1:50pm.  Then CAREFULLY wrap the brisket in foil.    Seal it as much as you can to retain drippings and return to the smoker for two to four hours until the brisket reached an internal temperature of about 207 degrees.  The thermometer will slide right in with very little resistance.   207 degrees sounds crazy to some that find a rare steak (130 degrees) the most tender… but there’s different chemistry happening.    The tissues in the tough brisket (collagen) only begin to melt at around 180 degrees.  You’ll just want to watch that the meat doesn’t dry out (keep it wrapped) and that the smoker isn’t too hot.

We pulled our brisket off at about 4:30pm with a reading of 206 and let it rest in a  cooler wrapped in paper bags (new trash compactor bags work well) until a half hour before time to serve.  The internal temperature will still rise when resting.   Give yourself plenty of time in the planning – we used all eight and a half hours (including an hour to let the meat rest before cutting).

Remember to carve against the grain into pencil thick ( quarter inch) slices if possible.  Our results were so tender we had to cut a bit thicker.    Electric slicers come in handy here.

Total cook time – about nine hours.   Process starts the night before.  Our experiment was with 6.5 pond brisket.

Serves about 12 to 16 (WITH 6.5 LBS.)

November 11, 2009 Competitions

Third Place BBQ Chili

Chili with Sour CreamLove a good Chili Cook-off?   This was a last minute – rush to slap together – concoction that just happened to be a crowd pleaser!   Unfortunately, it didn’t win with the judges in the office cook-off … but out of eleven other entries I heard some unsolicited (it was a blind judging) raves for it’s traditional chili taste and it’s hearty barbecue meatiness.   The winning chili was fantastic but was fairly eclectic with red wine and venison.

In a last minute / night before frenzy I decided to use a leftover pork tenderloin as the meat of choice.  It worked great… but feel free to substitute something a bit less expensive (like pork shoulder).     The lean tenderloin did however make for a low fat and overall healthy and hearty bowl of comfort.    Third place was still a favorite.

3RD PLACE BARBECUED CHILI

BBQ Chili With Tenderloin

BBQ Chili With Tenderloin

1.5 lbs Pork Tenderloin (substitute leftover pork shoulder or pulled pork)

2 packages Chili seasoning mix

1 whole large white onion (diced)

5 green onions (chopped)

1 tsp prepared garlic

1/2 red bell pepper (sliced in slivers for texture and appearance)

1 – 15 oz can of black beans

2 – 15 oz. cans of kidney beans

8 fresh Tabasco peppers (substitute: 3 jalapenos) finely minced

2 – 15 oz. cans of diced tomatoes

4 fresh ripe red tomatoes – diced

1 – 15oz. can Tomato sauce

Brown cooked pork in oiled skillet. Add onions and garlic and cook until transparent.

Transfer to deep pot or crock pot, add the rest of the ingredients and simmer.  Add up to a cup of water for preferred consistency.  Serves 10 to 20.

November 5, 2009 Featured

Grilling The Ultimate BBQ Chicken

Foul Play

Foul Play

Grilling the Ultimate BBQ Chicken
By Richard Calvin Myers

You don’t have to be a grilling pro to cook like one. So many recipes on the grill only call for a few things to make them phenomenal: fresh ingredients, the right seasoning, and proper cooking time. Just three little things to remember and your food will surprise everyone. One of the most versatile foods in the entire world is chicken. This fine feathered friend of ours has been prepared thousands of ways over hundreds of years. One of America’s favorite ways to eat chicken is barbequed. It’s so simple and delicious, yet people tend to get the formula wrong and their chicken comes out tasting like rubber smothered in ketchup.

The first thing people do wrong is overcook the chicken. They leave the poor little pieces of chicken on the grill for hours until there’s nothing left but dehydrated meat and bone. You want to cook your chicken only to 170 degrees, never more. The idea is to let the chicken rest. Carryover heat will increase the temperature to 180 degrees, the safe point at which you can eat chicken. Chicken will remain juicy as long as it’s not overcooked. Don’t worry about drying it out. As long as it cook it the proper length of time, it will be just fine.

Ultimate BBQ Chicken:

This BBQ chicken recipe is really simple and super delicious. The first thing we’ll want to do is to go shopping. I personally like chicken thighs for this recipe, but you can choose what you wish. Make sure to grab a bottle of your favorite BBQ sauce. The trick here is in the seasoning, we won’t need to make a fancy sauce for these. The seasoning consists of salt and pepper, garlic powder, onion powder, paprika, rep pepper, and some old bay seasoning. Whatever you don’t have already, pick some up.

We want to start the night before you grill and begin to season the chicken. We’ll need to make a quick spice rub. To do this, take two tablespoons of salt and black pepper, 1 tablespoon of garlic powder, onion powder, paprika and old bay, and a ½ teaspoon of red pepper. Combine all these ingredients in a bag or a container, and that’s it. Wash the chicken pieces and let dry thoroughly. After they’re completely dry, rub the chicken liberally with the seasoning. Wrap your chicken in foil or plastic wrap, place in a leak-proof container, and let it sit overnight. Be careful to never cross contaminate when dealing with raw poultry.

On the day you’re ready to grill, cut your burners on medium heat. After your grill heats up, oil the racks well and place your chicken pieces skin side down. Once they start to cook, close the lid. Check on them every 5 minutes or so to make sure they’re not burning. All together, we want to give them 15 minutes on the skin side. After that, turn over and repeat the checking and waiting process. Let them go for another 15 minutes and them begin to sauce your chicken.

Saucing is the last step. Make sure you keep a close eye on your chicken, the BBQ sauce will burn quickly due to its high sugar content. After you finish saucing one side of the chicken and turning it over, the pieces should be ready to turn back over after saucing the opposite side. They should only take about 3 minutes on each side to cook the sauce on. Be careful taking the chicken pieces off of the grill. This recipe is really simple. It’s all in the seasoning. These seasonings play very well with chicken, especially BBQ. The paprika has a nice, deep smoky taste. This recipe will be a hit with even the toughest crowds.

Richard Myers is the contributing author for this website and is an acknowledged expert in the field of grilling. He can be found on the internet at: http://www.TheGrillingCoach.com

Article Source: http://EzineArticles.com/?expert=Richard_Calvin_Myers
http://EzineArticles.com/?Grilling-the-Ultimate-BBQ-Chicken&id=1453183

October 8, 2009 Featured

Creating Perfect Ribs in Your Smoker

By Joe Johnson

In all honesty, I love ribs, but I hate the ribs that the vast majority of establishments serve. Rarely do I get ribs that are done properly as most tend to be either dry and leathery, or soft and mushy. Worst part is, most of these establishments believe that slathering the ribs in a barbecue sauce will bring them back to edible status. Well they are wrong…all it serves to do is add to my frustration by making the meal messy.

While very few, if any, chefs, pit masters, or home-cooks strive to achieve a leathery finish, you do hear the statement that “falling off the bone” is the way to go. While I agree that tender and soft is the ultimate goal, any competition rib that completely falls off the bone is considered completely over-done. A truly perfect rib will adhere to the bone, but fall off when tugged. So my goal with this post is to show you how to achieve a perfect rib at home. The key to good ribs has four components – the rub, the smoke, the heat, and the time. Let’s begin with the rub.

The point of using a rub is to develop a flavor base and to create a crust or bark on the ribs. Depending on where you go and whom you talk to, the rubs you have to choose from will reflect regional influences. Some will be hot and spicy, whereas others will be sweeter. I am partial to the Pork and Poultry Blend from Caroline’s Rub, which has a more typical Texas flavor – more savory than sweet. I like sweet, don’t get me wrong, but I prefer my ribs with more kick than candy, so I let my wood choice add the sweetness. Before applying the rub, the first thing I do is remove the thin skin that covers the back side of the ribs. Using a filet knife, I loosen it from one end, grip it with a paper towel, and then pull it off in one easy motion. While you don’t absolutely have to remove this skin, taking a few extra seconds to do so will definitely improve the tenderness of your final outcome. I then rinse and thoroughly dry the ribs, and follow that with a thorough coating of my chosen dry rub. How much you use, will entirely depend upon you. I like a thicker coating, some will prefer less. Next take the coated ribs, and tightly wrap them in plastic wrap, place in the refrigerator and let sit for at least 3 hours. This will give the rub time to penetrate and flavor the ribs. Once the ribs have sat, remove from the refrigerator and allow them to return to room temperature before putting on the smoker.

While the rub adds an immediate kick of flavor, the smoke you choose will work to complement the rub, and add that flavor we all recognize as barbecue. With meats such as pork ribs, I like to kiss the meat with smoke from pecan and cherry woods. The pecan is very similar to hickory in flavor, without the strong bite that can sometimes overpower the lighter meat of the ribs. The addition of cherry wood to the mix serves to work with the pecan to sweeten the meat.

Next factor for success is heat. While there are a thousand ways to cook ribs, many of which yield a truly great product, I prefer slow smoked ribs. Nothing gets my blood pumping like the smell of slow smoked barbecue. I have always found that higher temperatures result in tougher ribs, so my goal is to maintain a low heat level of around 215F to 225F in the smoker (or in your oven at home). This temperature range has yet to fail me. Once I have the smoker where it consistently holds the temperature within this range, I will place the ribs standing in a rib rack, inside for cooking.

Finally, the last factor for creating successful ribs is the cooking time. While many folks insert a thermometer in their ribs to determine doneness, I prefer simply watching the bones. For an average rack of baby back ribs, you can assume a cooking time of between 3 ½ and 4 hours at the temperatures I recommend. The easiest way for me to determine if my ribs are done is to perform two steps, starting with the first at the 3 hour mark – look at the bones. If I have a good ¼ – ½ inch of bone showing, I then perform step two, which is to take a toothpick and insert into the meat. If it slides through will little resistance, like going through butter, the ribs are done. You will want to watch them closely as they will go from done to overdone fairly quick.

Once cooked, I like to let the ribs rest for at least 10 minutes to allow the juiced to evenly distribute themselves within the meat, which will keep things tender and moist. Like I said earlier, I don’t like messy, so I tend to serve the ribs dry, with a side of my favorite barbecue sauce for dipping.

Following this method has consistently provided me with ribs that are succulent, moist, and truly satisfying.

Joe Johnson is a proud Texan and founding partner and chief pit-master with Caroline’s Rub, where he is in charge of product promotion and development for their line of gourmet dry rubs, smoked salt, and Texas chili seasoning.

Article Source: http://EzineArticles.com/?expert=Joe_Johnson
http://EzineArticles.com/?Creating-Perfect-Ribs-in-Your-Smoker&id=193036

August 16, 2009 Featured

Tips For Grilling Steaks on a Gas Grill


By Andre Savoie

Grilled to Perfection: Tips to Keep the Sizzle in Your Gas Grilled Steak

Are you tired of guessing the best ways to prepare the grill and the meat? Have you eaten enough over-cooked, dry steak? Have you wondered how restaurants produce those steaks with the picture perfect grilling pattern? If you answered ‘yes’ to any of those questions, then you will appreciate these simple tips. Here are some answers to common questions about grilling steaks.

  • What temperature? Before you get started, determine how everyone likes their steak cooked. Use the highest heat for rare or medium-rare, and medium heat for medium or well-done. This sounds counterintuitive, but the rarer steaks need to cook fast at a high heat in order to sear the outside and keep the inside rare. The more well-done steaks should cook slowly on a medium heat in order to avoid burning the outside and drying out the inside.
  • How to prepare the grill? Oil the grill by brushing a thin layer of oil on the grates. You can also rub the steak fat onto the grate using tongs.
  • How to prepare the meat? While the grill is heating, remove the steaks from the refrigerator and let them come to room temperature before placing on the grill. Rinse and trim the fat.
  • How to treat the meat? Keep the steaks moist and tender by coating with a thin layer of cooking oil and the seasoning of your choice. A little salt and as much pepper as you like are good default seasonings. You can also try garlic powder, or a dash of cayenne pepper.
  • When to flip the steak? Look for signs that the steak is starting to bleed through. You’ll see small red spots, which will tell you it’s time to flip the steak over.
  • Although you only need to flip it once, flipping it multiple times will create a nice criss-cross pattern. Grill each steak for one minute. Turn on the grill on the other side for one minute. Then, turn and replace at a 45-degree angle for half of the remaining cooking time. Turn once more at a different 45-degree angle for the final minutes on the grill.
  • How long should it cook? Although a thermometer (see below) is suggested, it’s good to have a general idea of how long to cook each steak. Here are some general guidelines, depending on the thickness of the steak:
    • 1″ Thick Steaks – Rare 8-10 minutes, Medium 12-14 minutes, Well 16-20 minutes
    • 1 1/2″ Thick Steaks – Rare 10-16 minutes, Medium 16-20 minutes, Well 22-26 minutes
    • 2″ Thick Steaks – Rare 12-16 minutes, Medium 18-22 minutes, Well 24-28 minutes
  • When is the meat done? We all know the cut and look method to determine of the meat is done. This isn’t ideal, because if it’s too late, then you’ve overcooked the steak. If it’s too soon, then you run the risk of drying out the meat. This is the perfect time to use a meat thermometer, ideally a meat fork.
  • When is the meat ready to eat? The steak continues to cook for abut 5minutes after you remove it from the grill. Keep this in mind when determining the optimal temperature for your preferred ‘doneness’. Let the steaks rest for 5 minutes before eating.

Few things say summer like the sizzle and aroma of a steak cooking on your gas grill. Grilling the perfect steak may be easier than you realize. And if you follow these easy tips, you’ll be sure to dazzle your guests and family. Just remember that with a little preparation, some patience, and the right tools, grilling the perfect steak to please everyone is easy. Follow these tips, and you can just sit back and relax. Let your grill do the work for you.

Andre’ Savoie writes for BBQGrillCompany.com who offers high quality Lynx BBQ grills brands. We also offer articles that will teach you how to best use your grill including steak grilling tips.

Article Source: http://EzineArticles.com/?expert=Andre_Savoie
http://EzineArticles.com/?Tips-For-Grilling-Steaks-on-a-Gas-Grill&id=2344406


July 11, 2009 Featured

Pita Chips – Making Them Easy

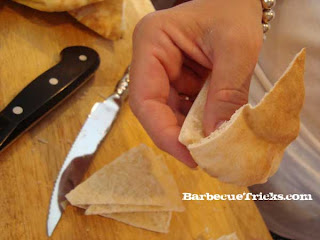
Barbecue’s big flavors often call for a collection of robust sides. Often times a backyard cookout is accompanied by some cheap potato chips. Here’s a way to dress it up and offer a slightly healthier (baked) alternative. Sure you can buy pita chips in the store, but they tend to be small overpriced bags and not enough for small gathering.

Go ahead and try to make these chips at home they’re super easy and we nailed it on the first try.


Garlic Pita Chips

1-2 packages pita bread

Olive oil

Seasoned salt

Garlic powder

Olive oil spray

  • Cut pita bread in half, then cut each half into four triangles and separate each triangle.

  • Place chips on baking sheets lined with parchment paper and brush heavily with olive oil.

  • Sprinkle salt and garlic powder over all. (One side only for best result.)

  • Bake at 350 degrees for 8 minutes.

  • Flip chips and spray with olive oil spray.

  • Bake 6-8 more minutes until golden brown. (For convection, use 325 degrees and only 6 minutes on the second round.)

  • Drain on a paper towel and serve with your favorite dip!

  • « Go to Previous Page
  • Page 1
  • Interim pages omitted …
  • Page 22
  • Page 23
  • Page 24
  • Page 25
  • Go to Next Page »

Primary Sidebar

Welcome To BBQTricks!

Hey Y'all... Thanks for stopping by. I'm Bill West. I blog about BBQ and occasionally country music. When it comes to BBQ I try to find solid time saving tips and tricks to make the grilling life a bit easier. It's life hacking for the backyard cooker. Read More…

Your Gateway to Barbecue Information

This site is a member of The Smoke Ring BBQ Webring A linked list of BBQ websites

Next BBQ Site - Next 5 BBQ Sites - Prev BBQ Site - Random BBQ Site

Join the BBQ ring or browse a complete list of The Smoke Ring BBQ Webring member's BBQ sites

If you discover problems with any of The Smoke Ring BBQ Webring sites, please notify the Ringmaster

fb

Footer

DISCLOSURE:

Posts on this site may contain affiliate links. If you purchase something via one of these links you won’t pay more but the site operator gets a small commission. Or as I like to call it: “beer money.”

Copyright © 2025 — Barbecue Tricks • All rights reserved.